
Do you want to ask for a phone number in your contact form, add an option, or make a field mandatory? You can do this yourself in the Gravity Forms form editor. You drag fields into the form and adjust them in the sidebar.
In short
- Open the form via Forms → Forms.
- Drag a field from Add Fields to your form.
- Under Field Settings, adjust the label and check Required if necessary.
- With Conditional Logic, you can show a field only if the visitor selects something.
- Click on Save Form. The formatting is handled by your theme.
Step 1: Open the form
Go to Forms → Forms and click on the name of the form. The form editor opens. On the left, you see the form as it currently is, and on the right, the sidebar with Add Fields and Field Settings.
Step 2: Add a field
At the bottom right of Add Fields, the fields are grouped, such as Standard Fields (for example, Single Line Text, Paragraph Text, Dropdown, Checkboxes, Radio Buttons) and Advanced Fields (for example, Name, Email Address, and Phone). Drag the field to the position in the form where you want it, or click on it to add it at the bottom.
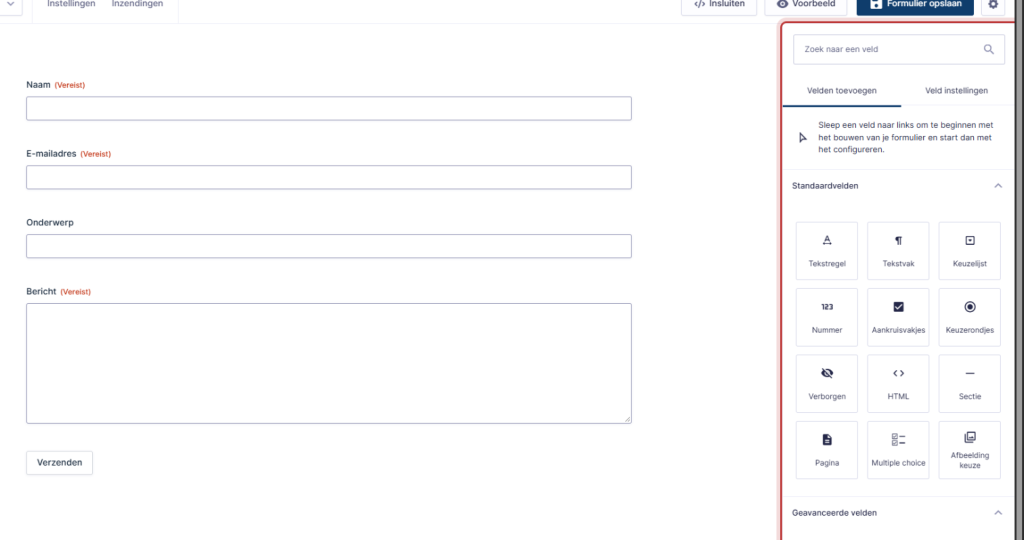
Tip: always choose the Email Address field for an email address instead of a regular text field. Gravity Forms will then check if the address is correct, and you can use the field to reply directly.
Nog geen website op leflite?
Wij bouwen hem samen met jou. Daarna pas je alles zelf aan, precies zoals in dit artikel.
- Online binnen een week
- Hosting, SSL en back-ups inbegrepen
- Vanaf €49,95 per maand

Step 3: Label, description, and required
Click on a field in the form. On the right, Field Settings opens. The main settings are:
- Field Label: the question above the field, for example, “Your phone number”.
- Description: a brief explanation below the field, for example, “We will only call if it’s faster.”
- Required (under Rules): the visitor can only submit the form if this field is filled out. The label will then have an asterisk.
Under Appearance and Advanced, there are more options, such as placeholder text in the field. You usually don’t need that.
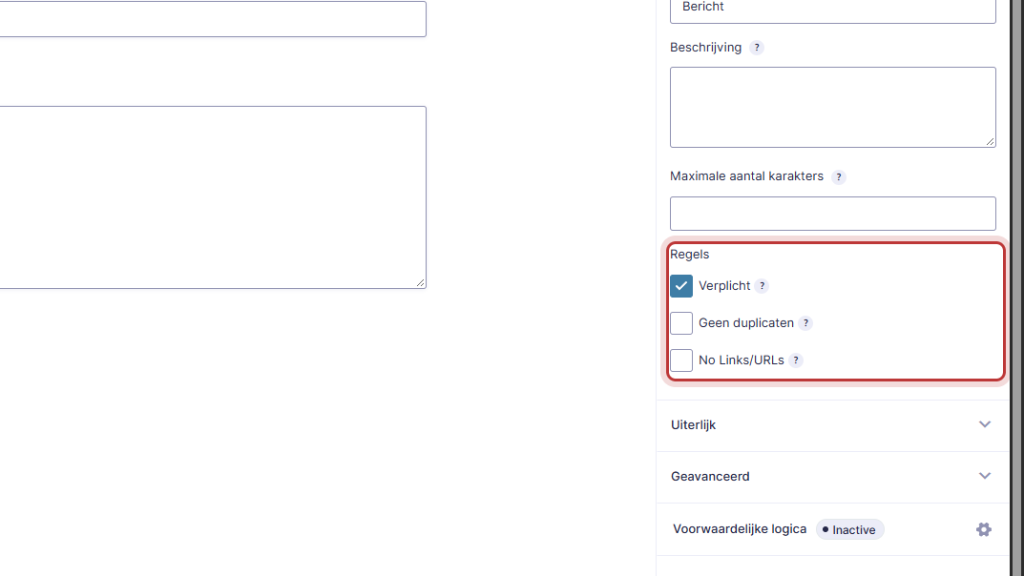
Note: do not make too many fields required. Each additional required field costs submissions. Name, email address, and the message are usually enough.
Adjusting a dropdown or checkboxes
For a Dropdown, Checkboxes, or Radio Buttons, you will see the Choices in the field settings. Click on Edit Choices. Type a new choice in an empty line, add a line with the plus, and drag the choices into the correct order. With Bulk Add / Predefined Choices, you can paste an entire list at once, one choice per line.
Show a field only if… (conditional logic)
Sometimes you want to show a field only when necessary. For example: the field “Your phone number” only appears if someone selects “Call” for “How would you like to be contacted?”
- Click on the field that should sometimes be hidden.
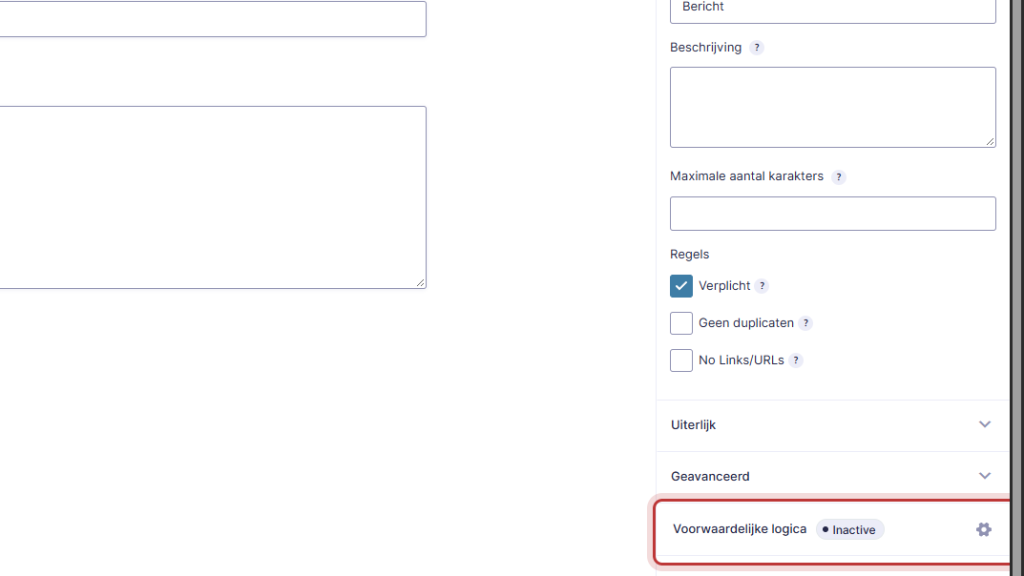
- Open in the field settings Conditional Logic and turn Enable Conditional Logic on.
- Choose Show this field if All (or Any) of the following match, and set the rule: the field “How would you like to be contacted?” is “Call”.
Change the order
Grab a field in the form and drag it to another position. Do you want two fields next to each other, like first name and last name? Drag one field next to the other until you see a vertical line.
Step 4: Save
Click on Save Form in the top right. The change will be immediately reflected on every page where the form is located. After that, check the page on your phone and fill out the form yourself once.
The appearance (colors, font, buttons) comes from your theme, not from Gravity Forms. Therefore, settings for color or style in Gravity Forms have little effect, and that is intentional: this way, every form remains in your brand style.
Note: if you delete a field, it will also disappear from the notifications. If the notification uses that field, for example, the email field in Responses To, then adjust the notification. See set who receives the form messages. Old submissions will also lose the data from a deleted field.
Not working?
- The change is not on the website. Did you click on Save Form? Refresh the page afterward. If your website uses a cache, wait a moment or ask us to clear the cache.
- The form cannot be submitted. A required field may be hidden by conditional logic or is no longer in the form. Check the required fields.
- The new field is missing in the email. Does your notification use custom text instead of
{all_fields}? Then add the field to the notification message. - A field looks different from the rest. The theme styles the standard fields. A very special field type may differ; let us know.
Can’t figure it out? Contact us or call 06 35 66 47 73. We would be happy to help.
Good to know: what happens after submission is not managed in the editor but under Settings of the form. Read adjusting the thank you message and preventing spam.
Share this article

Robert Oosterloo
Robert Oosterloo is eigenaar en UX/UI-designer van Lef Creative in Kollum. Hij ontwerpt websites, webshops en software voor ondernemers in Noord-Nederland.
Read also
How do I ensure that the email from my website arrives?
How do I set who receives the form messages?
I’m not receiving messages from my form: what now?






Want a website like this?
Here you can read how easy it is to maintain a leflite site yourself. Want one too? We will think along with you, no strings attached.
Prefer direct contact? Call Robert at 06 35 66 47 73 or send a WhatsApp.