
How do I enable a wishlist in my webshop?

Robert Oosterloo
Updated on · 3 min read
With a wishlist, customers can save products for later. They click on a heart icon next to the product and find their list in their account. In leflite, you enable the wishlist in three steps: the settings, the permalinks, and a heart icon in your menu.
In short
- Enable Wishlist functionality on the Webshop tab.
- Then save the permalinks again: Settings → Permalinks → Save Changes.
- Add the Menus the Wishlist item.
- The wishlist works for customers who are logged in.
Step 1: Enable the wishlist
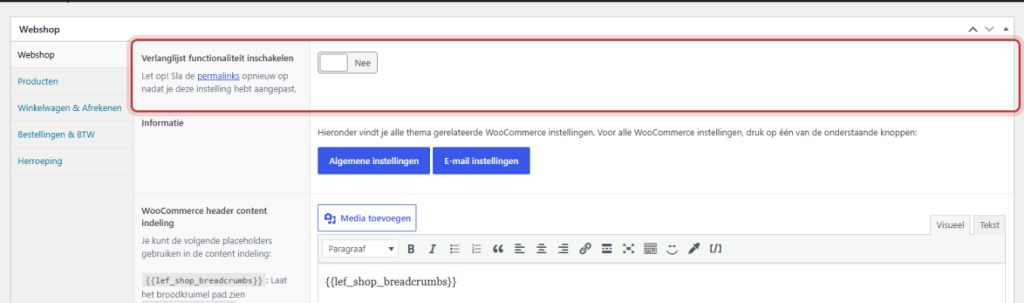
- Go to General Options → Webshop. The Webshop tab is open.
- Enable Wishlist functionality.
- Click on Update.
Step 2: Save the permalinks again
The wishlist gets its own address in My Account. WordPress only recognizes that address once you save the permalinks again. The help text next to the switch also says: “Note! Save the permalinks again after you have changed this setting.”
- Go to Settings → Permalinks.
- Change nothing and click on Save Changes at the bottom.
Nog geen website op leflite?
Wij bouwen hem samen met jou. Daarna pas je alles zelf aan, precies zoals in dit artikel.
- Online binnen een week
- Hosting, SSL en back-ups inbegrepen
- Vanaf €49,95 per maand
Step 3: Add the heart icon to your menu
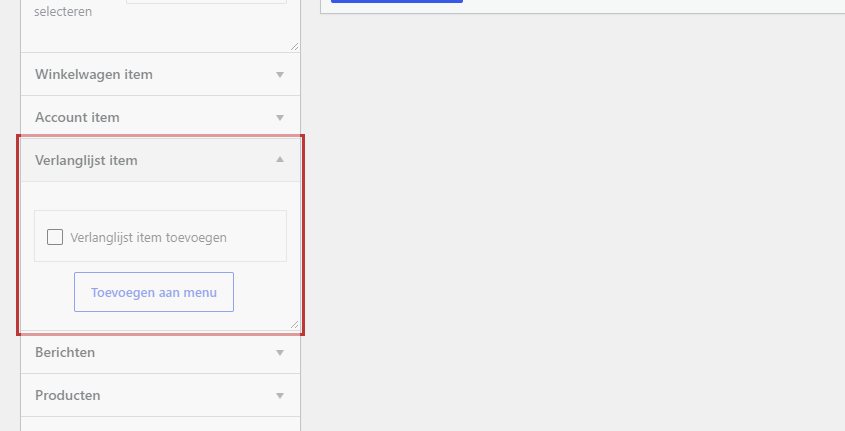
- Go to Menus and choose the menu in your header.
- On the left is the box Wishlist item. It only appears if the wishlist is enabled.
- Check Add Wishlist item and click on Add to Menu.
- Drag the item to the right place, for example, next to the cart icon.
- Click on Save Menu.
In the list of menu items, the item is called [Wishlist]; on your site, it will appear as an icon. You can read more about menus in customizing the main menu.
What does the visitor see?
- In each product card and on the product page, there is a heart icon. See also setting up product cards.
- If the visitor is logged in, clicking will add the product to their wishlist. Another click will remove it.
- If they are not logged in, they will see the message “You must be logged in to add a product to your wishlist. Would you like to log in?” with a link to My Account.
- In My Account, there is a new section Wishlist, with all saved products.
Good to know: Since the wishlist is linked to an account, customers must be able to create an account. Check in WooCommerce → Settings → Accounts and Privacy if that is possible.
You can find all webshop features listed in everything about your webshop.
Having trouble?
- My Account → Wishlist gives an error page. Save the permalinks again (step 2).
- You do not see the Wishlist item box in the menus. Is the wishlist enabled? Also check the top right under Screen Options to see if the box is checked.
- There are no hearts next to the products. Refresh the page with Ctrl+F5. If your site uses a cache, clear it.
- A customer says the heart icon does nothing. They are probably not logged in. They will see a message asking them to log in.
Still having issues? Contact us, call 06 35 66 47 73 or email info@lefcreative.nl.
Share this article
Robert Oosterloo
Robert Oosterloo is eigenaar en UX/UI-designer van Lef Creative in Kollum. Hij ontwerpt websites, webshops en software voor ondernemers in Noord-Nederland.
Read also
Display categories as buttons or cards
How do I set how products are displayed in the overview?
How do I customize the sidecart?






Want a website like this?
Here you can read how easy it is to maintain a leflite site yourself. Want one too? We will think along with you, no strings attached.
Prefer direct contact? Call Robert at 06 35 66 47 73 or send a WhatsApp.