
Since June 19, 2026, you must provide consumers with a clear button that allows them to easily undo an online purchase: the cancellation button. In a leflite webshop, this is built-in, with its own cancellation page, emails, order statuses, and a button to approve or reject requests. In this article, you will read how it works and what you need to set up.
In short
- The button is located on the thank you page, in the confirmation email, and with the orders in My account.
- The customer selects which items they are returning on the cancellation page and confirms with Finalize purchase cancellation.
- You set everything up in General options → Webshop, tab Cancellation.
- You approve or reject requests in the order, in the box Cancellation.
Note: This article explains how the feature works on your website. It is not legal advice. If you are unsure whether your webshop complies with the regulations, check with the ACM or a lawyer.
Why a cancellation button?
A consumer is allowed to undo an online purchase without reason within the reflection period. From June 19, 2026, this must also be easy, with a clear button, and the customer must receive a confirmation. leflite takes care of that for you: the button, the page where the customer makes their request, and the emails.
How does it work for your customer?
- The customer sees the button Undo purchase on the thank you page, in the confirmation email, and with their orders in My account. The button appears a few minutes after ordering.
- They go to the cancellation page (default
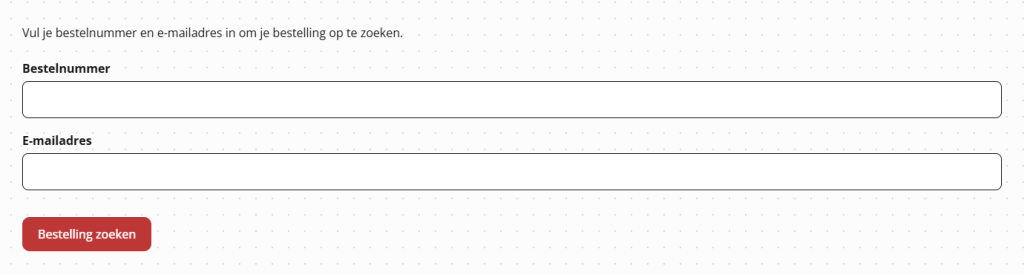
/cancel). Through the button, their order is immediately recognized. If they come without the button, they can look up their order using Order number and Email address; an account is not needed. - They choose which items and how many they are canceling, and optionally a reason.
- They click on Finalize purchase cancellation, see a confirmation page, and receive a confirmation email.
- You receive a notification via email. The order receives the status Cancellation requested.
Nog geen website op leflite?
Wij bouwen hem samen met jou. Daarna pas je alles zelf aan, precies zoals in dit artikel.
- Online binnen een week
- Hosting, SSL en back-ups inbegrepen
- Vanaf €49,95 per maand
Step 1: Open the Cancellation tab
Go to General options → Webshop and click on the Cancellation tab. At the top, there is a brief explanation. All fields have a good default value, so the button works even if you don’t change anything. Click on Update after making a change.
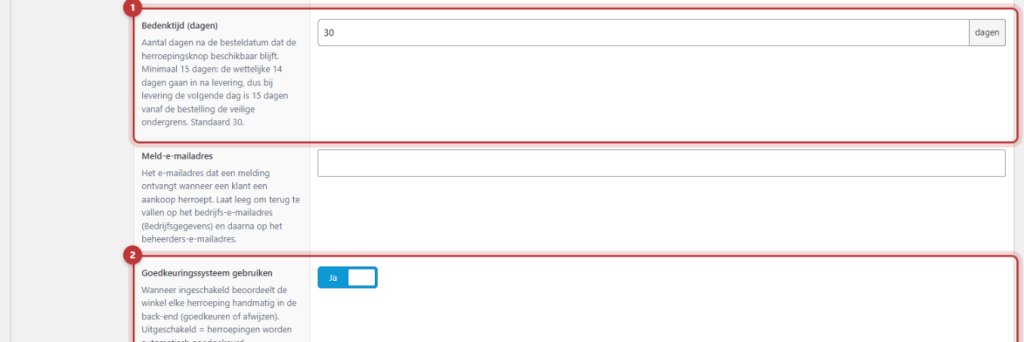
Step 2: Set the reflection period
In Reflection period (days), enter how long the button will remain available. The default is 30 days, and the minimum is 15. The legal 14 days only start when the customer receives the product; with a minimum of 15, you are always safe. The period counts from the moment you set the order to Completed. As long as an order is still being processed, the customer can always cancel.
Step 3: Adjust the texts and buttons
All texts have a default. Leave a field empty to use that.
- Cancellation button text: default “Undo purchase”.
- ‘Search order’ button text, Confirmation button text (“Finalize purchase cancellation”) and ‘Back to website’ button text.
- Page title (header): the header of the cancellation page, default “Cancel purchase”. Browser/SEO title: the title in the tab, default “Cancel”.
- Page URL (slug): default
cancel. Only lowercase letters, numbers, and dashes. - Introduction text above the form and Text above the confirmation button: use
{days}for the number of reflection days; leflite will fill that in automatically. - Confirmation page text: what the customer sees after confirming.
- Extra text for customer email: for example, how the return and refund process works.
Step 4: Set the notifications
In Notification email address, enter who will receive an email when a customer cancels. If you leave it empty, the notification will go to the email address from your company details, otherwise to the admin address. You can adjust the emails themselves (confirmation, store notification, approval, and rejection) under WooCommerce → Settings → Emails.
Approve and automatically refund
If Use approval system is enabled (default), you will review each cancellation yourself. Open the order in WooCommerce → Orders. In the box Cancellation, you will see the date and the items. Optionally, type a message and attach Files (e.g., return label); these will be sent as an attachment and then removed from the server. Click on Approve or Reject. The order will receive the status Cancellation approved or Cancellation rejected and the customer will receive an email. What else is included in those emails, you fill in at Extra text for approval email and Extra text for rejection email.
If you turn off the approval system, every cancellation will be automatically approved.
With Automatically refund upon approval, WooCommerce will immediately refund the canceled items upon approval. This only applies to orders with the status Processing or On hold, so those that have not yet been shipped. You will refund completed orders yourself once you have received the return. Whether automatic refunds work also depends on your payment provider; test it first or ask us.
Use an external system
Are you already managing your returns through another system, for example from your shipping partner? Then enable Use external cancellation system and enter the address in External cancellation URL. With {order_number}, you can place the order number in the URL. The buttons will then go to that system, and the cancellation page, emails, and statuses from leflite will not be used.
Note: If you are using an external system, you remain responsible for ensuring that it meets legal requirements: a clear confirmation page and a confirmation of receipt with the order and the date and time.
The button is also on the thank you page after checkout; see setting up the cart and checkout. If you also sell to businesses, read showing and shifting VAT. More features: everything about your webshop.
Having trouble?
- The customer does not see a button. The button only appears a few minutes after ordering, and not for orders that have not yet been paid, canceled, or failed. If the reflection period has expired after completion, or if a cancellation has already been requested, it will also disappear.
- The cancellation page shows an error message. Have you changed the Page URL (slug)? Go to Settings → Permalinks and click on Save changes.
- You are not receiving notifications. Check the Notification email address. If the email still does not arrive, read ensuring that the email from your website arrives.
- Automatic refunds are not happening. This only works for orders that are Processing or On hold, and only if your payment provider supports refunds from WooCommerce.
Can’t figure it out? Contact us, call 06 35 66 47 73 or email info@lefcreative.nl.
Frequently asked questions
The statutory cooling-off period is 14 days after receipt. In leflite, you set a minimum of 15 days, standard 30, calculated from the moment you mark the order as Completed.
Yes. Through the button in the email or on the thank you page, or by entering their order number and email address on the revocation page.
Share this article

Robert Oosterloo
Robert Oosterloo is eigenaar en UX/UI-designer van Lef Creative in Kollum. Hij ontwerpt websites, webshops en software voor ondernemers in Noord-Nederland.
Read also
Display categories as buttons or cards
How do I set how products are displayed in the overview?
How do I customize the sidecart?






Want a website like this?
Here you can read how easy it is to maintain a leflite site yourself. Want one too? We will think along with you, no strings attached.
Prefer direct contact? Call Robert at 06 35 66 47 73 or send a WhatsApp.